Pages

Showing posts with label recipes. Show all posts

20 June 2011

letha's pineapple cream pie

in honor of father's day, i made this pie for my wonderful father-in-law - fred.
this recipe is his mom's - letha - and is also his fav-o-rite pie.

i have altered the original recipe a bit through the years - always tweaking to make it better and hopefully better for fred.  i'd love to know if you try it and what you think of it...

letha's pineapple cream pie

1 baked pie crust - cooled - i use this recipe

filling:
2 cups evaporated milk
3/4 cup sugar
dash of salt
put these three items in medium pot on stovetop

in medium bowl combine:
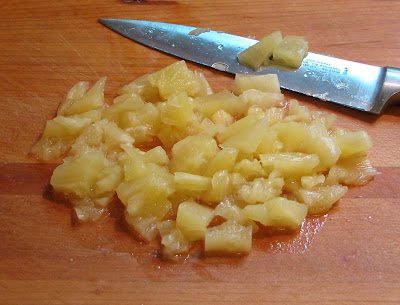
1 can pineapple chunks, extremely well drained, roughly chopped (here's a picture of it...)
or you could used crushed pineapple, i've just found that rough chopping the pineapple myself makes for a nicer pie -

4 tablespoons cornstarch mixed with a little cold water - then pour over pineapple
3 egg yolks (i save the egg whites for the meringue i put on the pie - i use 4 egg whites for the meringue, so i go ahead a set said 4 egg whites at this point)
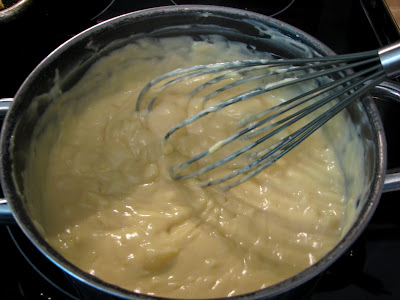
dump the bowl ingredients into the pot on the stove.

combine all ingredients with whisk.  turn on the heat.  i have a ceramic cook top and use a 4 - so medium heat... stir constantly until it begins to thicken and boil.  as soon as it begins to boil, stir constantly for one more minute. 

pour filling into cooled pie crust...


meringue

now, i know that there are lots of meringue recipes...
this one works for me.
i use a viking mixer with a whisk attachment (i had a kitchen aid mixer that i used before the viking and it worked well for meringue too).
the weather can play with your meringue - humidity can make this difficult to have it turn out great - but oh well.  just do the best you can :)

i usually wipe out the mixing bowl and whisk with white vinegar right before i make this.  a tip from julia child.  makes sure there is no grease/fat in bowl...

4 egg whites
dash of salt
1/4 cup sugar - superfine if you happen to have it

beat the egg whites and salt on high speed for three minutes... looks like this for me -


with mixer running, g-r-a-d-u-a-l-l-y add 1/4 cup sugar.  this usually takes me 2 minutes.  after 6 minutes TOTAL mixing, mine looks something like this -


mix 2 more minutes or so...  you're looking for a stiff mixture -


begin to spread over pie...


make sure you bring the meringue all the way up to the edges of the crust all the way around.

 
put all the meringue over the pie -


bake at 350 degrees for 8 to 12 minutes, checking to make sure the meringue gets evenly browned.  i usually check mine after about 8 minutes and turn the pie to have it browned on both sides.


my father-in-law loves this best the second day...

22 June 2010

easy peasy pie crust

This was originally shared with me by my friend (who also happens to be my mother-in-law - yes I am VERY blessed :)

She got this from her Mom - who I believe got it from Betty Crocker...

very simple ingredients:
for  single pie crust
(if you want a double, just double the recipe)
Preheat oven to 475 degrees

2 cups (280 grams) all purpose flour - 
my latest favorite is Eagle Mills - I'll post more about it soon
1/2 teaspoon salt
1/2 cup oil - sometimes just a tad more - I have found depending on the weather
1/4 cup milk*  see below for more on the milk part

Mix flour and salt in bowl with fork.  Pour oil into measuring cup and add milk.  Do not mix.  Make a well in center of flour/salt and pour in milk/oil.  Stir with fork until mixed.  Place sheet of wax paper on counter, with a bit of water underneath so it won't slide around.  
Put mound of crust on wax paper and cover with another sheet of wax paper.  
Roll out with rolling pin to desired thickness. 
Take off top wax paper and put pie plate beside crust.

Lift up crust on the wax paper and do your best to flip the crust onto the pie plate.

Gently pull away the wax paper. 
Now, if the crust breaks or whatever, just repair it.  This crust is incredibly forgiving.  Today, I know, my pictures make it look easy, but I have had days where I have had huge rips and tears.  No biggie, just piece it back together.
Shape the edges - I usually go around the rim and make sure I have an even amount of crust for the edge and then shape it how I want it to look.  
And yes, scissors can help even things up...

If this is for a baked pie crust, poke lots of holes in the bottom and up the sides with a fork and then bake till done - this can be 8 to 12 minutes.  Set your timer and check often.

I have tried baking with stuff in the crust (you know like beans) to keep the crust from getting puffy, but I have found that if I prick enough holes with the fork, I don't have any problems.
I will post a pic of the baked crust soon - sorry - I forgot...

*As far as milk goes, you can try different kinds and see what you like.  I have had some interesting results.  
This crust was made with vanilla soy milk. My in-laws like ones I make with evaporated milk.  I recently tried whipping cream and it was great with a fruit pie.  Have fun and happy baking! 
I'd love to know what you think :)

11 October 2009

Me Cookie Monster - Me Want Cookie!


Quaker's Best Oatmeal Cookies -
slightly modified to Jason's taste...

Ingredients
1-1/4 cups (2-1/2 sticks)  butter, softened
3/4 cup firmly packed brown sugar
1/2 cup granulated sugar
1 egg
1 teaspoon vanilla
1-1/2 cups all-purpose flour
1 teaspoon baking soda
1/2 teaspoon salt
3 cups Oats (old fashioned, uncooked - you can use quick, but we like the consistency of old fashioned ones)
1 cup walnuts (if you like them)

Heat oven to 375°F. In large bowl, beat margarine and sugars until creamy. Add egg and vanilla; beat well. Add combined flour, baking soda, salt; mix well. Add oats; mix well.

Drop dough by rounded tablespoonfuls onto ungreased cookie sheets.
Bake 8 to 9 minutes for a soft cookie.  The edges will be lightly browned and parts of the top (see the picture below).  Experiment until you find what your family lkes best.
Store tightly covered if there are any left :).


16 July 2009

Easy Peasy Pasta Salad

My friend Laura shared this incredibly yummy recipe.
SO easy... and SO good!
It takes a box of bowtie pasta, Girard's Romano Cheese Dressing, tomatoes,
spinach and an avocado. Optional is a favorite cheese.
So...
this first part is best done the night before)
cook the bowtie (aka farfalle) pasta (a 16 oz. box) according to directions on box.
Drain when done.
Pour pasta into the bowl you want to serve your pasta salad from
(I love when you only use one bowl... I don't like to wash dishes :)
Dump the entire bottle of the dressing on top of your pasta and stir.


Cover with plastic wrap and put in fridge overnight. (I have done this all in the same day and it was good, but it really is better if it can sit overnight).

Right before you want to eat this salad, add:
leaf spinach (I buy a 9 oz bag and add about 2/3... but do according to your taste)
diced tomatoes (I like seeded Romas - I use about 4 to 6 of them)
a diced avocado
totally optional is the cheese - I personally have never done this, but you could add feta, Parmesan, etc.


This last time I did add set some grilled chicken out to the side for those who wanted to add it.


If you try it, let me know what you think.
This is one that is great as a leftover too.
Happy eating :)

Click here for a printable version

11 October 2008

Foccacia anyone?

We have had a lot of kids over lately - cycle break (affectionately known as pyscho break around here). The elementary school starts mid July, then on for nine weeks and then off for three. Well, these past weeks have been the break which means extra kids over to play everyday... which also means lots of meals to make!
Yesterday afternoon I made a big foccacia which became the staple for dinner.


Some had ham sandwiches, some BLT and even a peanut butter and jelly was made.
I used my artisan bread recipe - so EASY!!!


If you haven't tried it yet, here is the recipe:

Recipe: Simple Crusty Bread
(from NY Times)
Published: November 21, 2007

Adapted from “Artisan Bread in Five Minutes a Day,” by Jeff Hertzberg and Zoë François (Thomas Dunne Books, 2007)

Time: About 45 minutes plus about 3 hours’ resting and rising

1 1/2 tablespoons yeast

1 1/2 tablespoons kosher salt

6 1/2 cups unbleached, all-purpose flour, more for dusting dough

Cornmeal.

1. In a large bowl or plastic container, mix yeast and salt into 3 cups lukewarm water (about 100 degrees). Stir in flour, mixing until there are no dry patches. Dough will be quite loose. Cover, but not with an airtight lid. Let dough rise at room temperature 2 hours (or up to 5 hours).

2. Bake at this point or refrigerate, covered, for as long as two weeks. When ready to bake, sprinkle a little flour on dough and cut off a grapefruit-size piece with serrated knife. Turn dough in hands to lightly stretch surface, creating a rounded top and a lumpy bottom. Put dough on pizza peel sprinkled with cornmeal; let rest 40 minutes. Repeat with remaining dough or refrigerate it.

3. Place broiler pan on bottom of oven. Place baking stone on middle rack and turn oven to 450 degrees; heat stone at that temperature for 20 minutes.

4. Dust dough with flour, slash top with serrated or very sharp knife three times. Slide onto stone. Pour one cup hot water into broiler pan and shut oven quickly to trap steam. Bake until well browned, about 30 minutes. Cool completely.

Yield: 4 loaves.

Variation: If not using stone, stretch rounded dough into oval and place in a greased, nonstick loaf pan. Let rest 40 minutes if fresh, an extra hour if refrigerated. Heat oven to 450 degrees for 5 minutes. Place pan on middle rack.

Here is an article from the NY Times about this kind of bread...
http://www.nytimes.com/2007/11/21/dining/21brea.html?ex=1353301200
en=981b61782a1df842&ei=5124&partner=permalink&exprod=permalink

I love that the dough is in the fridge waiting for me... for bread, pizza, foccacia... amazing!

It really was a time saver last night!

20 May 2008

Easy Dinner

Grilled chicken

This is an easy chicken my father in law shared with me years ago. Chicken of your choice (my kids love thighs) (skin removed of course!)...
You can marinate this up to 24 hours, or pour the dressing on the chicken on the grill.


Use any Italian dressing of your choice - for me usually whatever is on sale. the dressing can be full fat, light, or fat free. If marinating ahead of time, put chicken in ziploc and pour dressing to coat, then refrigerate.


Put grill on high heat (this can also be done in a skillet on the stovetop or in the oven in a casserole dish). Place chicken on grill. I always add more dressing on the grill and then sprinkle with Lawry's salt and garlic POWDER. Cook till done on one side. Flip over and cook till done on other side.
You're done.
The night I cooked this chicken, I actually put these tenderloin pieces on the grill frozen.


I also grilled up some onions (drizzle with shoyu or soy sauce and olive oil before grilling).


I added a salad and baked red potatoes...
I actually ate the leftover half of my California Pizza Kitchen Veggie foccacia sandwich (Yummy!)
Everyone else was happy with their food :)

12 May 2008

Another recipe...

Tomato Basil Quesadillas
Jason really looks forward to vine ripened tomatoes and fresh basil every summer. I always plant basil (grow in in a container on the deck). I usually make him tomato basil salad, but decided to give quesadillas with this filling a try. I also tried them on the grill - Jason loved them :) Jacob did too!
I'm not good at writing down my recipes, so here we go...


Tomatoes - diced and excess juice and seeds (just some, don't stress over this) removed (either roma, or any tomato of your choice)
Sliced scallions to your liking
finely diced onion of your choice - I usually use red or Vidalia
1 - 2 cloves garlic - minced
small handful of fresh basil - chiffonade slice or roughly chopped
drizzle with olive oil (or canola if you don't have olive on hand)
fresh ground black pepper
sea salt
Tortillas - I like mission homestyle or azteca homestyle (I like flexible tortillas)
Cheese of your choice... mozzarella is good, I used grated colby jack on these ones

You can do this in the skillet or on the grill...
If using grill, use medium heat. Brush vegetable oil on one side of tortilla. Lay tortilla on grill, put cheese on half of tortilla. Put a layer of tomato/basil salad on top of cheese, and then put another small layer of cheese on top of salad. Fold empty half over covered side. Cook till done on both sides. Slice in quarters and serve...
Yum!


06 April 2008

Quesadilla Recipe

2 tortillas
Oil (olive or canola) OR Pam cooking spray
Garlic salt
Black beans (rinsed well)
Grated cheese of your choice (I use Cheddar/Monterrey Jack blend)
Lawry's Hot taco seasoning (or mild if you wish)
Optional: onions, tomatoes, jalapeños, salsa
chopped lettuce
Ranch dressing of your choice (Jason likes kraft "light done right" 3 cheese)
Optional toppings, but good...
Sliced green onions, tomatoes, taco bell hot sauce, guacamole

Heat skillet to medium
Pour in a small amount of oil into the skillet (like about a teaspoon) or spray with Pam -
Sprinkle oil with garlic salt (again a small amount - maybe 3 shakes)
Place 1 tortilla over oil/salt (I usually rub the tortilla around in the pan to make sure it is evenly coated with the oil/salt)
Sprinkle tortilla with cheese
Add a single layer of beans over cheese
Sprinkle with taco seasoning
At this point you can add you chopped tomotes, onions, jalapeños, fresh cilantro or salsa if you wish... I probably wouldn't add all - choose 1 or 2 things
Cover with a layer of cheese (just to cover)
Place other tortilla on top
Cook till first tortilla is golden brown then flip over and cook second side till golden brown
Place on serving plate and cut with pizza cutter into wedges
Top with lettuce (generous amount) tomatoes, etc.
If serving with guacamole, place this in center of quesadilla (makes a nice presentation that way...
Also, small opening bottles (like the ketchup/mustard ones they sell with the small spout openings) are great to put condiments in for this
The small opening makes it easy to control where you put your sauces - makes it easier to be "decorative" with them... if that doesn't make any sense, let me know and I will try to explain better
Hope these work for you as they do me.
For kids, I use mild seasoning and keep them very simple.
good luck :)

26 January 2008

bread


For those of you that know me well, you know very well that I LOVE bread (sometimes too much I think!). I always seem to be in search of an artisan quality bread that I can replicate here at home. This search has included recipes that are very time consuming... but now, that search is over. My Mom came across a book that has changed everything (thanks Mom!).
"Artisan Bread in Five Minutes a Day" (by Jeff Hertzberg and Zoe Francois) is all it claims to be.
It is amazing that so little time spent on bread can turn out such an amazing loaf!
Check out their website:
http://www.artisanbreadinfive.com

I have only scratched the surface of this book, but am already making amazing bread, that is even more amazingly simple!
My Mom has been trying more than the master recipe (I have been so satisfied with the bread from that... it has been hared to move on) and I will start this week.
Save your money from the bakery. Even my brother (who is a chef in California) has been making foccacia and bagels using these recipes in his kitchen.
Let me know what you think. Maybe I'll make a loaf just for you :).